 When you receive your handy talkie (HT) radio, plug it into the charger for at least 4 hours to make sure it is fully charged before turning it on for the first time, and before anytime you know you will be using it. Don't worry about leaving it in the charger too long, the charger LED will go from red to green when it goes into trickle charge mode. A full charge should last you more than 8 hours depending on how long and often you transmit.
You can bring the HT to me and I will program it for you with the most common or used frequencies and give you a printed list to refer to. Let me know if there are any other frequencies you want added in. Forget your new call letters? Your call letters and first name have been programmed by me into your radio to show in the display for about 2 seconds after turn on. If at any time you think you have pushed the wrong buttons, etc., don't panic, just turn the radio off for a few seconds and then back on.
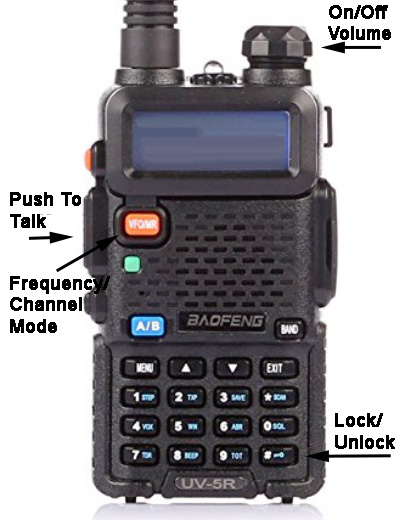 When you first turn it on with the volume control on the top, "China Girl" will say Frequency Mode or Channel Mode. Press the orange VFO/MR button to switch between the two. Most of the time you will be using the Channel Mode which has the preset frequencies programmed into your set of 127 memory channels. In Channel Mode only, you will see the respective memory channel number to the far right of the A and B frequency displays. To tell if you are on the A or B channel or frequency, there is an up triangle to the left of the A frequency or a down triangle to the left of the B frequency as shown below to indicate which has been selected. Use the blue A/B to switch between the two. It is common at races to use a repeater and a simplex frequency and it makes it easier and quicker to preset one in A and the other in B and switch between them. If the repeater goes off the air for what ever reason - time out for the long winded, interference, or you are in a bad location - you can transmit simplex on the repeater output by poking the orange VFO/MR key to go to Frequency Mode, then the 6 digit repeater frequency or any uncommon simplex frequency not in memory for that matter.
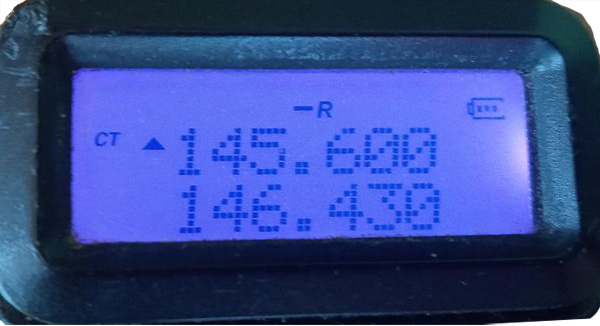
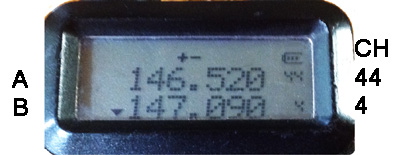 In Channel mode (MR - Memory Read), I programmed the frequencies of the repeaters or simplex of ones you are likely to use. This makes it easy to select any of them by just punching the 3 digit memory location number on the key pad while receiving. "China Girl" will repeat back to you the number you just punched. You can also increment the channel number one at a time using the up and down arrow keys. You may find using the up/down arrows easier than punching in the 3 digit channel when the channel you want to switch to is only a few away. Never change channels while transmitting. For channels 1-99 you have to start with a leading zero. As shown, memory channel 044 is set in A for the national simplex calling frequency 146.520 MHz used for sweeping, Summits On The Air, Field Day, etc. In B, shown as being selected, is on the the Catalina repeater 147.090 which was programmed into memory channel 004.
It is a good idea if on a run to lock the keyboard so you don't accidentily punch a button and throw it off channel. Hold down the #/lock key on the bottom right until you hear "China Girl" say "lock." Hold down again to "unlock" when you want to change channel.
In Frequency mode (VFO - Variable Frequency Oscillator), this is used to punch in the 6 digit frequency for a repeater or simplex that is not programmed in to Channel memory that you want to receive. This is OK for monitoring for now, but we can get into using this later after you have had some experience because it involves using the menu button to add in the Tone code and repeater offset before you can transmit. However, it is much simpler to program new frequencies you will use again on the computer and upload to your radio. The program I use to initially program your walkie talkie is called CHIRP. The download is free and makes it easy for you to reprogram your radio with changes or additions.
There is much more to this radio, but these are the basics to get you started. With its 4-5 Watts output, this radio will do everything you need on the most used 2 meter (144 MHz) and 70cm (440 MHz) ham bands in the area. The newer UV-5R3 version will also work on the 220 MHz ham band. For more descriptions of the buttons and functions of this radio, see page 8 of the UV-5R Manual.
 Bigger Antenna:
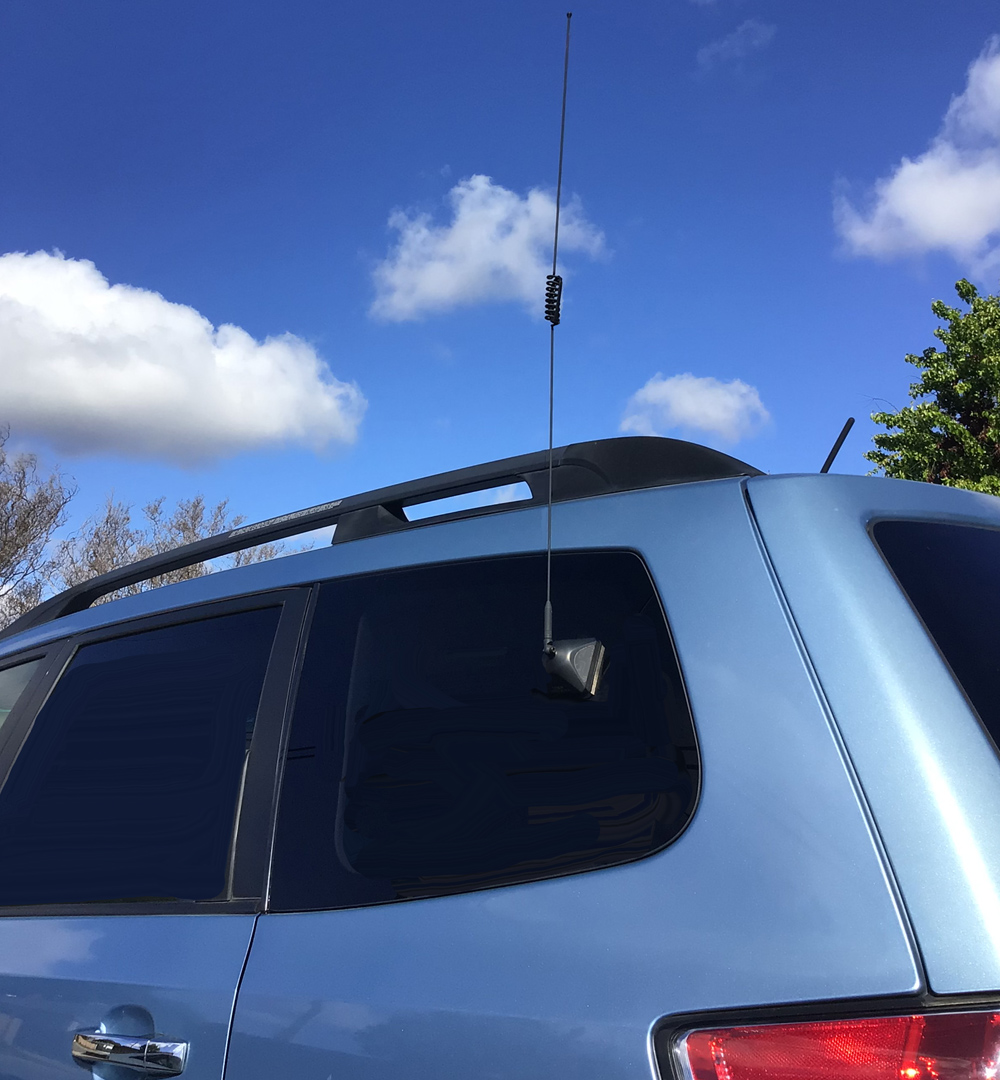
The "rubber duck" antenna that comes with the radio works well, but you can swap it out with a bigger antenna with a little more gain to increase both your transmit and receive signal strength. We suggest the 16" long Nagoya NA-24J whip antenna. This longer antenna has 5 dB on UHF and 3 dB more gain on VHF than the stock antenna but more attention needs to be made that it is placed vertical to realize it. However, you will need to take more care that it is not poking some one next to you. There are other long dual band whips, but the NA-24J tested out the best for me.
 For mobile, remove the whip and screw in the SMA cable from the mobile
Tram 1191 144 MHz / 440 MHz Dual Band Amateur Glass-Mount Antenna. This antenna mounts on the back seat side window with adhesive - no holes to drill for the coax cable. You might also want to get the Baofeng SM01 speaker/mic and Baofeng VPS001 vehicle power adaptor to make operating your UV-5R3 easier.
For mobile, remove the whip and screw in the SMA cable from the mobile
Tram 1191 144 MHz / 440 MHz Dual Band Amateur Glass-Mount Antenna. This antenna mounts on the back seat side window with adhesive - no holes to drill for the coax cable. You might also want to get the Baofeng SM01 speaker/mic and Baofeng VPS001 vehicle power adaptor to make operating your UV-5R3 easier.
Click on the images to enlarge.
Open Repeaters
Here are links to the lists of open coordinated repeaters by ham band in SoCal: 144 MHz, 220 MHz, 440 MHz, CA Repeater Map. You are welcome to use any open repeater on the list. Private or closed repeaters usually require membership or permission from the owner or control operator and may or may not be publically listed. The lists have the location, repeater call letters, frequency and tone for each one that you may want to program into your radio if not contained in the basic list. There is also a 2 meter simplex frequency list.
Basic Ham Procedures:
Listen before you transmit to make sure no one else is on. If they are, or you are in conversation, wait for the beep or squelch tail to know when you can start transmitting. Ham Radio is an only one station at a time can talk system. You must wait for the other stations to stop transmitting before you can talk. You cannot over talk another station. If two stations are transmitting at the same time - doubling - those listening will just get a lot of interference noise. Your cue to respond is when you hear a squelch tail crunch or a beep in the case of a repeater. Wait about 1 second before pressing the push to talk (PTT) button. Most repeaters have 1-3 minute continuous transmission time out timers. If you wait for the beep, you will know the timer has been reset. Speak in a normal voice about 3-6" from the microphone which is through a little hole above the A/B button.
FCC Rules say that you must direct your transmission to at least one other ham. The only exceptions are for short periods of testing or looking to make a contact with hams that may be monitoring and you don't know their call letters. If you need to "kerchunk" a repeater to test if you are on the right channel and receiving it, always end by saying; "This is KN6XYZ (your call) Testing."
So for example, if you know the call of the station you want to call, you give their call letters first - the ham you are directing your transmission to - followed by your call letters so that that ham knows who is calling them and satisfying the FCC Rule for your call ID at the end of a transmission. When I want to get a hold of Mary Ann I would say: WB6YSS from W6ORG or WB6YSS do you copy W6ORG or simply WB6YSS W6ORG. She would respond with W6ORG from WB6YSS. The station you are calling is always given first, and your call letters second. Once you have made contact, and are talking back and forth, you don't have to say call letters until the last transmission and within 10 minutes during the series of transmissions. So at the end of the transmissions when using FM, other stations will know you have stopped transmitting when they hear the squelch tail or beep. There is no need to say over or out. However some do say clear at the end of the final transmission or just give their call letters.
If I want to talk to any other ham who might be monitoring that frequency you could say: Any one copy W6ORG. Or simply say W6ORG monitoring. If some one listening on the channel wants to talk to you, they will call you back with your call letters followed by theirs.
Checking into a ham radio net is a good way to keep familiar with your radio and procedures. These are usually held weekly by radio clubs and Emcomm groups. A directed net is a little different; when they ask for guest check ins, they usually just want you to give your name, call letters (might need to give them phonetically until they get used to hearing you) and city. Most nets call for their members to check in first, generally alphabetically by call letter suffix groups or directly by their call letters. For example, on the Catalina Net, I check in (W6ORG) when they call for members with the suffix's O and P. For guests they may call for suffix's A through M, etc. By monitoring the channel you will quickly get the hang of it and each net has its own purpose and procedures.
If you want to be recognized by a net control or even two or more hams conversing, wait for the squelch tail and then just say your call letters. Do not say break, that is a hold over from CB. Your call letters tells it all to those listening and wait for them to recognize you.
Local Ham Nets with emphasis on Emergency Communications (Emcomm)
By listening in or checking in on a ham net as a guest or member each week or a few times a month, you can stay familiar with the operation of your radio and ham practices so that you will be more efficient and feel comfortable when you use it supporting trail races. We have an informal net just for Flyers interested in supporting trail race communications on Monday nights at 7:15pm to 7:30pm, and on Thursdays at 7:30-7:45pm on the private repeater on memory channel 001.
Most nets will call for "Guest" check-ins after they have called all the members of the group. To minimize a pile of of stations, they may call for check-ins based on the first letter of the call sign suffix (first letter after the number). Wait about 2 seconds after the net control or another station stops transmitting or you hear a repeater beep to transmit. If you double with another station, wait and try again. Check-in with your call sign given phonetically using the ICAO/NATO/ITU Alphabet to make it easier for the net control station to copy down your call letters and not have to ask for a repeat.
Monday 7:00pm - Catalina Amateur Repeater Assn. (CARA). 146.09+ repeater at the Airport in the Sky, memory channel 004. Starts with weekly ham news from the ARRL then CARA member check-ins. Guest check-ins taken at the end usually around 7:30-7:45. Check-in with first name, call letters and city. This club provides communications for the running races in Catalina as well as others in the LA/OC basin.
Monday 7:30pm - Sierra Madre Community Emergency Response Team (SM CERT). 144.330 simplex (156.7 tone), memory channel 048. Sierra Madre hams called first, then surrounding city hams who check in with some regularity and then any guest check-ins. Check in with first name, call letters and city. This group provides communications for the Mt. Wilson Trail Race, Alegria Ave Halloween Street event, Wistaria Festival , 4th of July Parade and other Sierra Madre events.
Monday 8:00pm - Altadena Local Emergency Radio Team (ALERT). Pasadena Telco repeater 145.180 - (156.7 tone), memory channel 045. The goal of ALERT is to facilitate radio communications throughout Altadena and surrounding communities before, during and after a community-wide crisis. ALERT members volunteer their radio experience and training with Community Emergency Response Team (CERT), Neighborhood Watch programs, the Altadena Sheriff’s Station, Map Your Neighborhood (MYN), Red Cross, Amateur Radio Emergency Service (ARES), Disaster Communications Service (DCS), and National Traffic System (NTS)
Wednesday 7:30pm - South Pasadena Radio Club (SPARC) 145.180- (156.7 tone), memory channel 045, atop the TELCO building in Pasadena. Provides training and services for Emcomm.
Wednesday 7:00pm - Pasadena Radio Club (PRC) 145.180- (156.7 tone), memory channel 045, atop the TELCO building in Pasadena. Holds a series of 7 Thursday evening ham license classes and testing at the end. These classes provide a real knowledge of amateur radio and equipment.
Thursday 8:00pm - Amateur Radio Emergency Service, Northeast LA section (ARES LAX NE). 446.940- (100.0 tone), memory channel 083, on Mt. Wilson and linked to a number of DARN System
repeaters. If you are blocked from DARN3 on Mt. Wilson, try one of the other DARN System repeaters that is stronger - Memory channels 81 to 88. After ARES Member check-ins guests will be called. ARES provides communications for LA County Disaster Communications (LA DCS), FEMA, AC100, and area hospitals. This is a good system to monitor during earthquakes, fires and other incidents.Saturday 8:00pm - Crescenta Valley Radio Club (CVRC) 146.535 simplex. Provides communications for the Montrose Christmas Parade and practice for the CVRC Emcomm plan.
Sunday 8:00pm - Crescenta Valley Radio Club What's Going On net. Repeater on Mt. Thom (Glendale) on 146.025+ (136.5 tone)
Changing or Entering New Frequencies into the UV-5R Memory Channels Manually
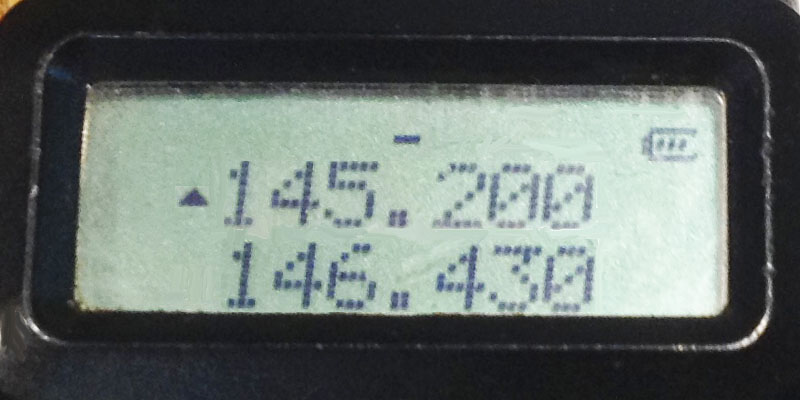
While you can program the memory channels and download to the radio, there may be a time in the field where you want to add another repeater channel or find the tone frequency has changed, etc. This procedure will tell you how to do it.For the example below, let's say you want to program into memory channel 8, a repeater (Arcadia) on an output frequency of 145.200 MHz with a negative offset of 00.600 MHz and a CTCSS tone of 103.5 Hz. This means your radio will be transmitting to the repeater on 144.600 and encode your transmission with a sub audible tone that the repeater will decode, key up and repeat your audio on 145.200 MHz.
Initial setup:
Make sure the radio is unlocked - Hold down the #/lock key in the bottom right of the key pad for about 2 seconds until you hear China Girl say: "UNLOCK."
Select the upper display row A by punching the A/B button.
Confirm that TDR (dual receive standby) is set to OFF by punching Menu then 7. If ON, immediately punch Menu then one of the arrow keys and Menu again to reset it to OFF. Punch Exit key.
 1. Punch (do not hold down) the VFO/MR button to hear her say: "FREQUENCY MODE."
2. Punch in 145.200 on the key pad. This should now appear on your readout in A.
- When using the MENU button, you will only have 10 seconds to make a selection after punching
any buttons in the menu mode. If you are too slow, or make a mistake, start over by punching the
menu button after it has automatically returned to 145.200.
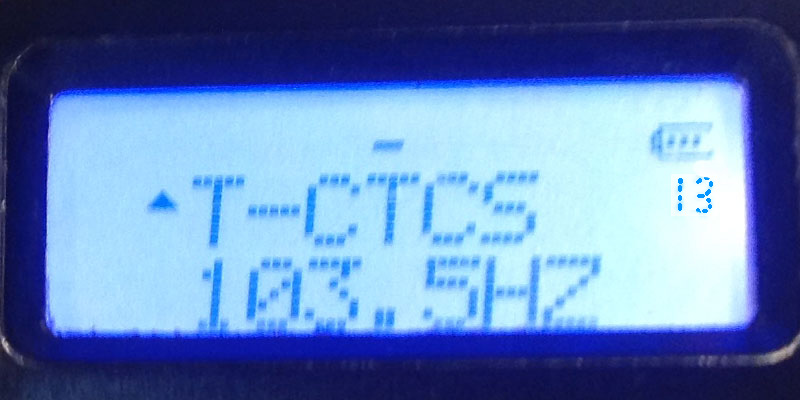 3. Punch the MENU button then 13. The menu number 13 will appear just below the battery symbol in the upper right. Menu 13 will show T-CTCS on the top and below it will say OFF
or a tone frequency. Punch MENU again and use the up/down arrow keys to get to the 103.5 tone
frequency and then punch Menu again to set it. Wait 10 seconds to return to frequency mode
or punch Exit.
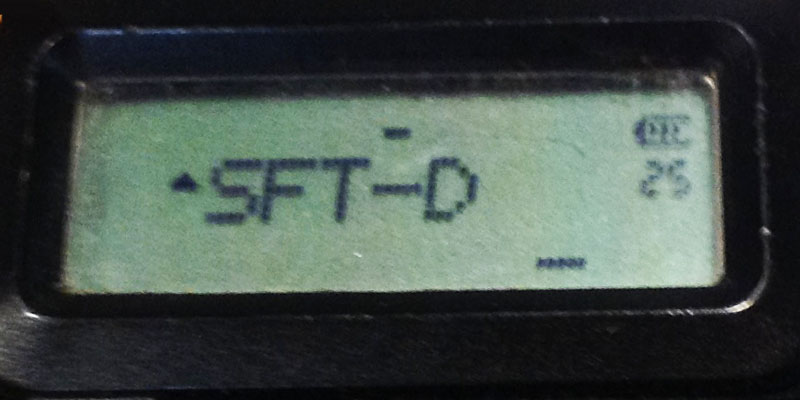 4. Punch the MENU button and then 25. Menu 25 will show SFT-D at the top and OFF, + or - at
the bottom. Punch MENU again and use the arrow keys to select -, then punch MENU again to set it.
Wait 10 seconds to return to frequency mode or punch Exit.
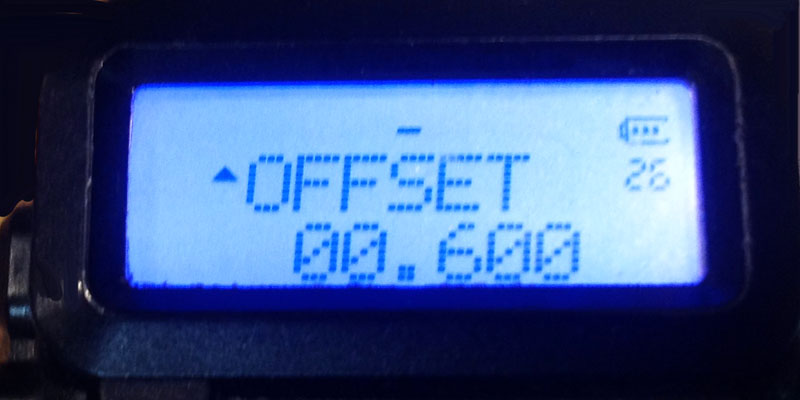 5. Punch the MENU button and then 26. Menu 26 will show OFFSET in the top and a 5 digit number
on the bottom. For 2 Meter VHF, the repeater offset needs to be 600 kHz or 00.600 MHz. If it is for a
70cm UHF the repeater offset needs to be 5 MHz or 05.000. The 220 MHz band is 1.6 MHz or 01.600.
For simplex it will be 00.000. Punch MENU then 00600, then punch MENU again to set it.
Wait 10 seconds to return to frequency mode or punch Exit.
- If you are in range of the new repeater, try keying it up at this time. When you transmit, the frequency should change from 145.200 to 144.600 if you did the repeater offset shift correctly. If you have set the frequency, offset and tone correctly, you should hear the repeater squelch tail, beep or ID. If so then you are ready to enter it into a memory channel.
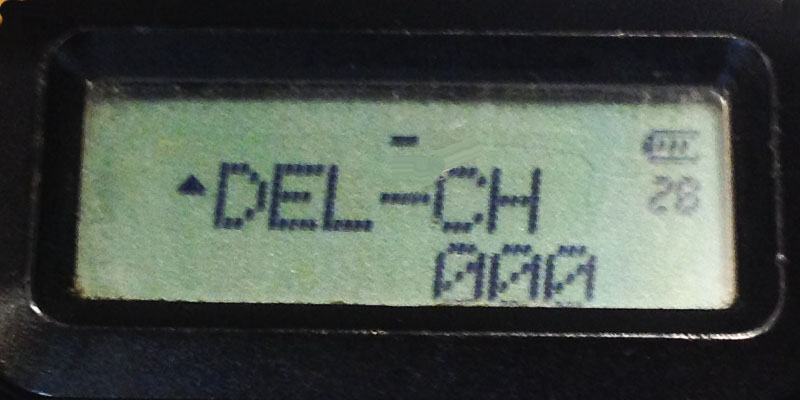 6. This radio does not allow you to overlay or directly replace a memory channel with new data.
First you must delete whatever is in the memory channel you want to enter the new data into.
Punch the MENU button then 28. Menu 28 will show DEL-CH on top and 000 on the bottom.
Punch the MENU button again and enter 008, then MENU again to delete whatever data is
in memory channel 008. Wait 10 seconds to return to frequency mode or punch Exit.
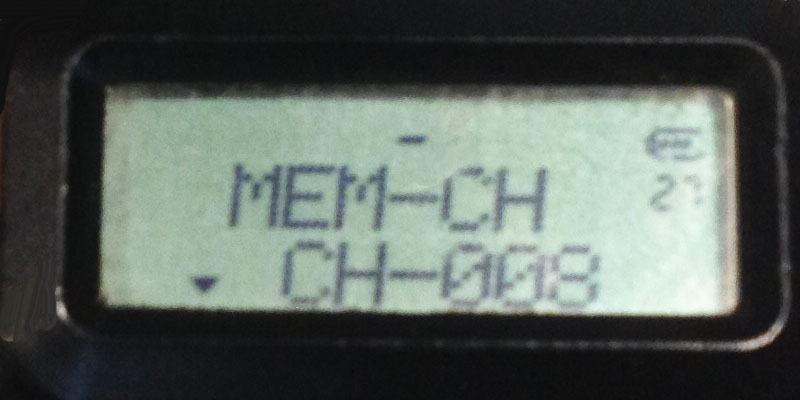 7. Punch the MENU button and then 27. Menu 27 will show MEM-CH on top and 000 on the bottom.
Punch the MENU button again then 008 (some models do not need leading zeros), punch MENU.
again to set it. This will transfer the receive frequency 146.200, you have set up in Frequency Mode
and display row A into memory channel 008. Wait 10 seconds to return to frequency mode or punch Exit.
 8. Punch the *scan button. This will display the transmit frequency 146.600, offset and reverse R indicator. Punch MENU 27 again and it should say "Memory Channel" and the prior selected receive memory channel. Then punch MENU again and it should say "Transmitting Memory". Wait 10 seconds to return to frequency mode or punch Exit.
9. To verify, punch the VFO/MR button to go to "Channel Mode", then punch in the new memory channel - 008, and see if it reads 145.200. Note that you can only enter or change the Name of a channel using a computer with a program like CHIRP. Key the PTT switch and see if you can bring up the repeater and it reads 144.600 with the key down. Note, when programming in a simplex frequency, you will have to have someone come back to you since you will be transmitting on the same frequency as you are receiving. If you find you made a mistake or left something out, you will have to first delete that memory channel as in step 6.
Program the whole radio with CHIRP
CHIRP is an app or program that makes programming the memory channels in the UV-5R and over 200 other makes and models of radios quick and easy. Type the list once, upload to your UV-5R, then to your base and/or mobile radio. Below is a screen shot of the basicfreqb.img file I used to program most of the clubs UV-5R HT's. The program also has a repeater look up where you can enter all the repeaters by band, state/county or city/radius.
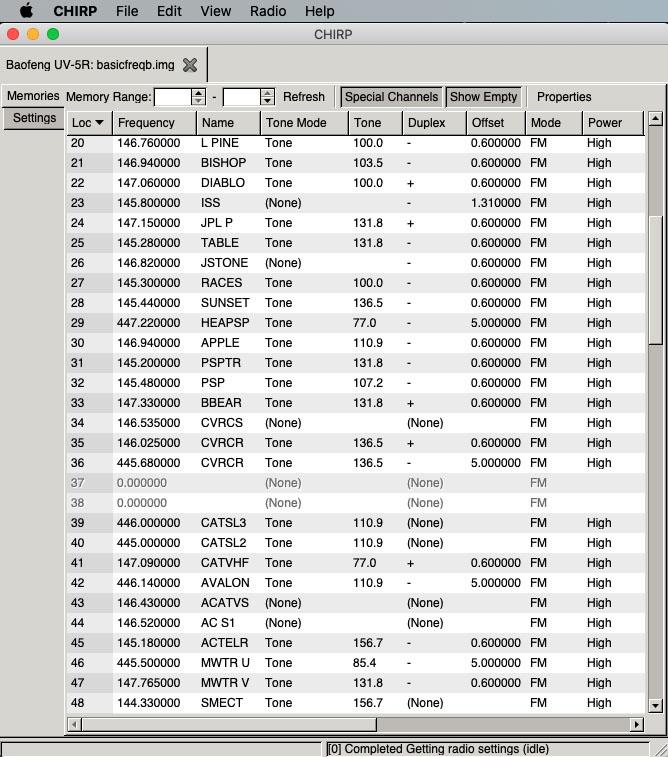 Only memory channels 20 to 48 are shown, but you can expand and scroll through all channels from 0 to 127 or what ever is the maximum for any of the applicable radios. Note channels 37 and 38 have not been programmed but Shown Empty and available to be programmed.
Memories Column Headings:
Only the ones we use are shown.
Loc - Memory channel number.
Frequency - Radio receive frequency.
Name - name of the repeater, location, use, etc. Up to 6 characters in caps.
Tone Mode - CTCSS transmit tone enabled or not. Required for most repeaters.
Tone - CTCSS sub-audible tone frequency.
Duplex - Offset direction, plus or minus for repeaters or none for simplex.
Offset - Offset frequency difference between the receive and transmit frequencies. Standard is 0.600 MHz on the 2 meter band, 1.600 MHz on the 220 MHz band, and 5.000 MHz on the 70cm band. Note the odd split for the International Space Station in channel 23.
Mode - FM (standard 5 kHz deviation with ham) or NFM (narrow 2.5 kHz deviation with other services).
Power - High (4-5 Watts) or Low (1Watt) with the UV-5R.
A deeper understanding of the column definitions can be found Here
Getting and installing CHIRP
This is the procedure to download CHIRP to your computer and open the program.
I suggest using Firefox for your browser for less hassle from Microsoft and Apple about downloading unsigned applications or ones not from them.
Before you click on get it!, scroll down and note the list of all the supported radios and find yours. It may say to use a slightly different model number in CHIRP. Ignore and delete any pop-ups.
Click on Download the latest CHIRP-next build here.
The download for your operating system should be highlighted in yellow.
Windows should see the latest chirp-next-2024-installer.exe file
Mac users should see the latest chirp-next-2024.app.zip file
Click on it. Your computer security may ask if you want to allow this download. Click Allow Anyway. Ignore the Windows Defender warnings, etc.
Click on and open the zipped file and install it.
 If successful you should see an icon that looks like an old RS232 connector labeled CHIRP. If not, see next paragraphs for MACs and Windows.
In Macs, double click the CHIRP Icon to open it. You might get a pop up that the developer cannot be verified or is unsigned. Click cancel, then while holding down the control key, click the CHIRP icon once then click open at the top of the pop up. You might have to click the icon while holding the control key down a few times and then open in the pop up to get it to open. It may ask for your user ID and password to add chirp and/or drivers to the permitted apps - go ahead and do that the same way you do when you start up your computer. Once you have gotten the CHIRP screen to open, you won't have to go through the control key procedure again.
In Windows, search for CHIRP which is likely in Program Files or your Download folder, and open it.
Using CHIRP
Turn on the radio and verify you are not receiving any station or noise. You may have to unscrew the antenna or select another channel if there is anyone on the channel or it is picking up static from the computer. Turn off the radio. Plug in your programming cable to the computer and the radio. Your computer should then recognize the USB com port and get the correct driver from the internet - make sure you are connected to the internet. Only use cables from reputable Baofeng dealers such as RandL Electronics - USB02. There are many pirate ones on the internet. The UV-5R uses the Prolific USB-to-Serial port version 3.2.0.0.exe driver in Windows and Prolific Driver PL2303_v0.3.1 in Macs - see USB Cable Drivers.
Turn the radio on then turn the volume control to minimum.
In the Chirp top menu, select Radio, then Download from Radio.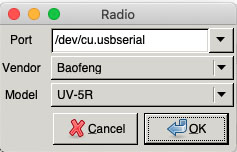

If you are plugged into the Baofeng UV-5R, in the pop up you should see either in Windows (left) or MAC (right):
If not, select the Vendor and Model. UV-5R works for the UV-5R3 also. Any time you plug in a different model radio for the first time, you need to do the Download from Radio so that CHIRP recognizes the radio's firmware version.
If the Cloning popup does not appear, turn off the radio and then back on. Most newer operating systems will automatically find the right com port when it is activated by the device being plugged into it, but some need to be reminded by unplugging the USB cable and plugging back in. When you get the popup, click OK. In Windows, you may have to try selecting other COM ports.
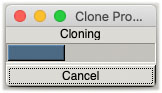 Your computer may have a pop up that has the Baofeng UV-5R instructions, click OK. Then it may ask if you want to use the experimental driver, click yes. A progress pop up should show a horizontal bar moving across and the radio will have a flashing light as it downloads.
When the download or cloning from the radio is complete, you should see a list of all the frequencies programmed into your radios memories. From the File menu, select Save As then name this file - I suggest your call letters plus ba for baofeng and 1 for your primary list. For instance, mine would be w6orgba1. The computer will save it as an .img (image) file when you click Save.
You will now be able to retrieve your primary channel mode memory list, make changes, and save it as your primary list or save as a separate named list you can upload into your radio when needed. You also might want to back up your primary memory channel named file.
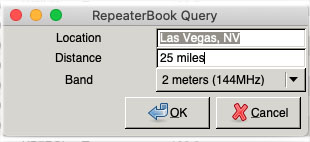 If traveling to another area, and you want to use your radio there, you can upload the repeaters in that state and county. Click on Radio, then select Query Data Source, select RepeaterBook, then RepeaterBook Political Query. On the Repeater Book Query pop up, select the state, county and band or all. Click OK and a new list will appear in CHIRP Memories. If you select instead RepeaterBook Proximity Query, you can enter a location (city, state) and radius distance (miles) as shown for Las Vegas at right. Click OK and that list will be downloaded from the internet to your memory list on CHIRP. Save As and name this file so you can retrieve it whenever you travel there again. When you return home, in the File menu, select open, then select your primary memory file and upload. RepeaterBook is a free service, the others require joining with a name and password.
That is the basics of CHIRP. We can get into the other features later like changing your power on message. For most of you, I had programmed your name and call letters to come up for a few seconds on the display at turn on. You can see that by clicking Settings just below Memories on the far left side, then clicking Other Settings.
This web page has CHIRP programming examples.
MAC CHIRP beginners guide. Windows and MAC drivers for your programming cable.
